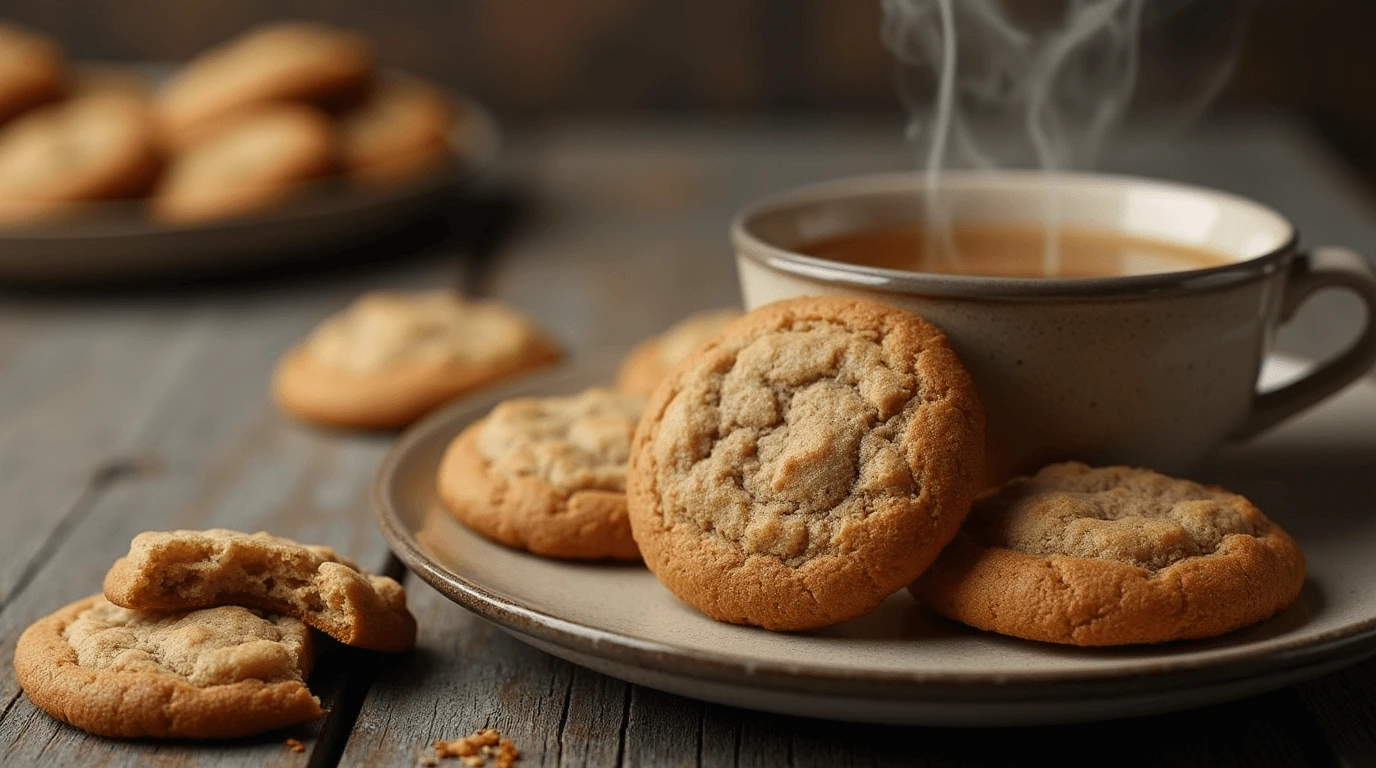
Have you ever wondered what happens when the delicate aroma of Earl Grey tea meets the buttery sweetness of a sugar cookie? These Earl Grey cookies are more than just a treat—they’re a cozy hug in every bite. Perfect for tea lovers and dessert enthusiasts alike, they bring the sophisticated flavors of bergamot and black tea to your cookie jar.
Whether you’re hosting an elegant tea party or simply indulging in a quiet moment, these cookies are as versatile as they are delightful. Plus, they’re surprisingly easy to make, even for beginner bakers! Ready to transform your favorite tea into a sweet, fragrant masterpiece? Let’s get started.
Table of Contents
Why You’ll Love This Recipe
These Earl Grey cookies are the perfect blend of sophistication and comfort, and here’s why they’ll become your new favorite:
- Unique Flavor Profile: The subtle floral and citrus notes of Earl Grey tea transform ordinary sugar cookies into an elegant treat.
- Simple to Make: With basic pantry staples and a few easy steps, this recipe is approachable for bakers of all levels.
- Perfect for Any Occasion: Whether you’re planning a tea party, looking for a unique gift, or craving something sweet to pair with your morning coffee, these cookies fit the bill.
- Customizable: Prefer a softer cookie? Love a zesty icing? This recipe offers flexibility to suit your taste.
- Irresistibly Fragrant: The moment these cookies come out of the oven, your kitchen will be filled with a warm, inviting aroma that’s impossible to resist.
If you’ve ever wanted to add a touch of luxury to your cookie repertoire, this recipe is the one to try. Ready to bake some magic? Let’s dive in!
Ingredients
To make these irresistible Earl Grey cookies, you’ll need a handful of simple ingredients, many of which you likely already have in your pantry. Here’s what to gather:
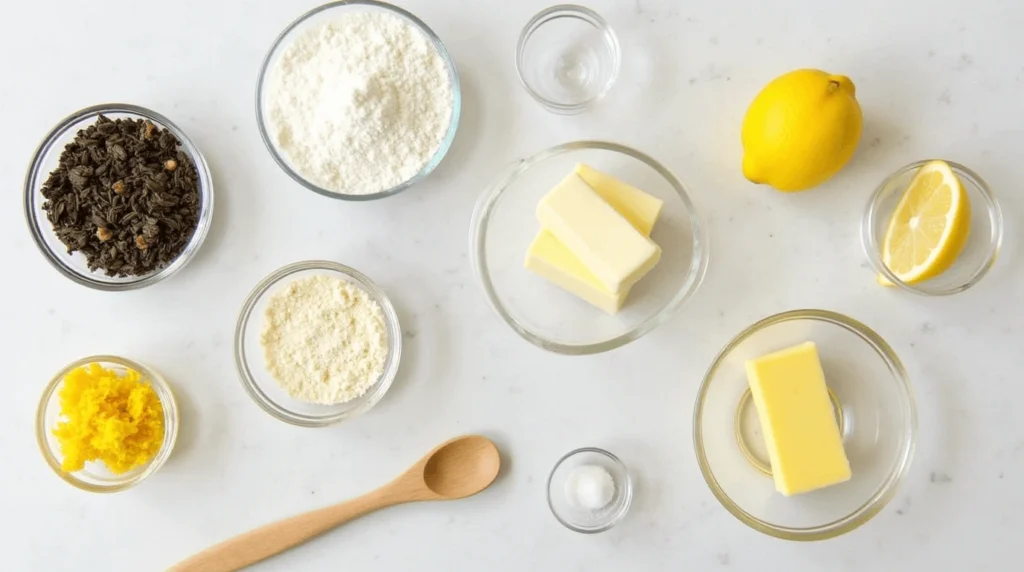
For the Cookies
- 2 cups (250g) all-purpose flour: The foundation of a perfectly balanced cookie.
- 1/2 teaspoon baking powder: Helps create a slight lift for a tender texture.
- 1/4 teaspoon salt: Enhances all the flavors in the recipe.
- 2 tablespoons Earl Grey tea leaves: Finely ground for a smooth infusion of flavor.
- 3/4 cup (170g) unsalted butter, softened: Brings rich, buttery goodness to every bite.
- 1/2 cup (100g) granulated sugar: Sweetens the dough just right.
- 1/4 cup (50g) powdered sugar: Adds a delicate texture to the cookies.
- 1 large egg: Binds the ingredients together and ensures a soft, chewy result.
- 1 teaspoon vanilla extract: A subtle companion to the Earl Grey flavor.
For the Icing (Optional)
- 1 cup (120g) powdered sugar: For a silky, sweet glaze.
- 2–3 tablespoons milk: Adjusts the icing to the perfect consistency.
- 1 teaspoon lemon zest (optional): Adds a bright, tangy contrast to the cookies.
Ingredient Notes and Substitutions
- Earl Grey Tea: Opt for high-quality loose-leaf tea or cut open a few tea bags. Grind the leaves finely using a spice grinder for the best texture.
- Butter: Ensure it’s softened for easy creaming. You can substitute salted butter but reduce the added salt in the recipe.
- Vanilla Extract: For a twist, try almond extract or a splash of orange blossom water.
- Lemon Zest: Optional but highly recommended for adding a burst of freshness to the icing.
Now that you have your ingredients ready, let’s move on to bringing this fragrant dough to life!
Tools
Having the right tools can make all the difference when baking these delightful Earl Grey cookies. Here’s a handy list to ensure your baking experience is smooth and stress-free:
Essential Tools
- Mixing Bowls: A set of large and medium bowls will help you combine wet and dry ingredients with ease.
- Hand Mixer or Stand Mixer: For creaming the butter and sugar to a light, fluffy perfection.
- Spatula: A silicone spatula works wonders for scraping down the sides of your bowl and folding in ingredients.
- Measuring Cups and Spoons: Accuracy is key to achieving the perfect cookie texture.
- Fine Mesh Sieve: Use this to sift the powdered sugar and flour for a smoother dough.
- Spice Grinder or Mortar and Pestle: Finely grind the Earl Grey tea leaves for even flavor distribution.
For Shaping and Baking
- Rolling Pin: Ensures even thickness when rolling out the dough for cut-out cookies.
- Cookie Cutters: Choose simple or decorative shapes to add a personal touch.
- Parchment Paper or Silicone Baking Mats: Prevents sticking and makes cleanup a breeze.
- Baking Sheet: A flat, sturdy sheet ensures even baking.
Optional Tools
- Zester: If you’re adding lemon zest to the icing, a fine zester is essential for extracting just the right amount of zest.
- Cooling Rack: Allows your cookies to cool evenly without becoming soggy on the bottom.
Pro Tips
- Prepping Ahead: Lay out all your tools before starting to avoid scrambling mid-recipe.
- Rolling Hack: Place the dough between two sheets of parchment paper to prevent sticking and reduce mess.
- Uniform Cookies: Use a small cookie scoop to portion dough evenly for consistent sizes.
With these tools by your side, you’ll feel like a pro in the kitchen. Ready to roll? Let’s dive into the process of making these fragrant, buttery Earl Grey cookies!
How to Make Earl Grey Sugar Cookies
Baking these Earl Grey sugar cookies is simpler than you might think! Follow this step-by-step guide, and you’ll have a batch of fragrant, buttery cookies ready in no time.
Step 1: Prepare the Earl Grey Tea
- Grind the Earl Grey tea leaves into a fine powder using a spice grinder or mortar and pestle. This ensures the tea blends smoothly into the dough, giving every bite a uniform flavor.
Step 2: Mix the Dry Ingredients
- In a medium bowl, whisk together the flour, baking powder, salt, and ground Earl Grey tea leaves. Set aside.
Step 3: Cream the Butter and Sugars
- In a large mixing bowl, use a hand or stand mixer to beat the softened butter, granulated sugar, and powdered sugar until light and fluffy (about 2–3 minutes). This step is key to achieving a tender cookie.
Step 4: Add Wet Ingredients
- Mix in the egg and vanilla extract until fully incorporated. Scrape down the sides of the bowl to ensure even mixing.
Step 5: Combine Wet and Dry Ingredients
- Gradually add the dry ingredients to the wet mixture, stirring until just combined. Avoid overmixing, as this can result in tougher cookies.
Step 6: Chill the Dough
- Wrap the dough in plastic wrap and refrigerate for at least 30 minutes. Chilling prevents spreading and makes the dough easier to handle.
Step 7: Roll and Cut
- Preheat your oven to 350°F (175°C).
- Roll out the chilled dough on a lightly floured surface to about 1/4 inch thick. Use your favorite cookie cutters to create shapes, and transfer them to a baking sheet lined with parchment paper.
Step 8: Bake
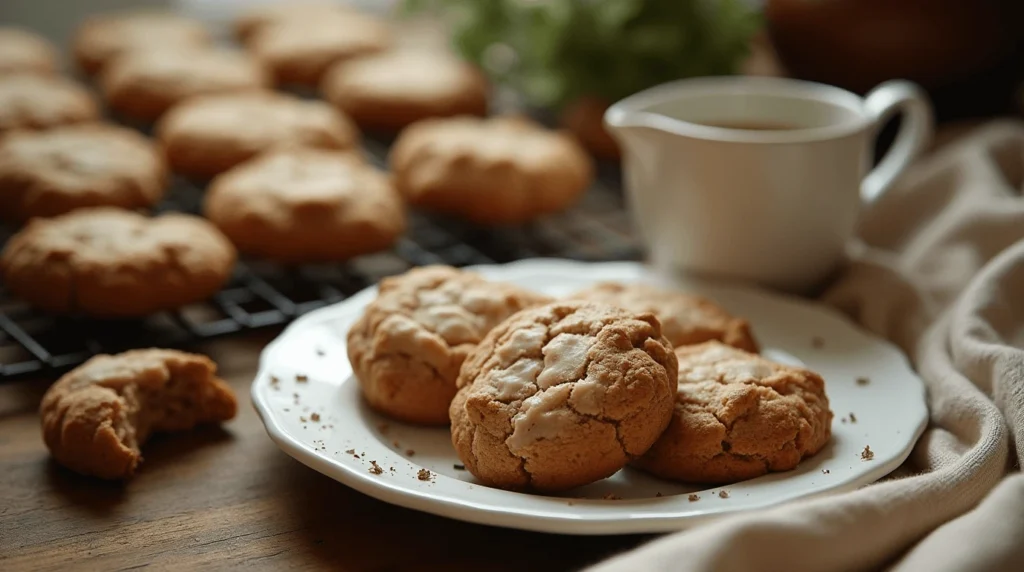
- Bake for 10–12 minutes, or until the edges are just starting to turn golden. Keep an eye on them to avoid overbaking.
- Let the cookies cool on the baking sheet for 5 minutes, then transfer to a cooling rack to cool completely.
Pro Tips for Perfect Cookies
- Test Batch: Bake one cookie first to check spreading and adjust chilling time if needed.
- Even Thickness: Use rolling pin guides or stack rulers on either side of your dough for consistent thickness.
- Flavor Boost: If you want a stronger Earl Grey flavor, steep the ground tea leaves in the butter before mixing.
With these steps, you’re well on your way to baking cookies that will impress everyone. Next up? Let’s whip up a luscious icing to make them even more irresistible!
For the Icing
Adding a sweet, glossy icing is the perfect way to elevate your Earl Grey cookies. Whether you prefer a subtle glaze or a more decorative touch, this icing is simple to make and versatile enough to suit your style.
How to Make the Icing
- Prepare the Base
- In a medium bowl, sift 1 cup (120g) of powdered sugar to remove any lumps. This ensures a smooth, silky icing.
- Add Liquid Gradually
- Stir in 2 tablespoons of milk, one tablespoon at a time, mixing thoroughly after each addition. Add more milk, 1 teaspoon at a time, until the icing reaches your desired consistency.
- For a thinner glaze, aim for a drizzle consistency. For thicker, spreadable icing, use less liquid.
- Enhance the Flavor
- Mix in 1 teaspoon of vanilla extract or a splash of almond extract for a subtle depth of flavor.
- Optional: Add 1 teaspoon of freshly grated lemon zest for a bright, citrusy contrast that complements the Earl Grey tea.
- Color and Decorate
- If desired, tint the icing with food coloring to match the occasion or add edible glitter for a touch of sparkle.
How to Apply the Icing
- Dip and Drizzle: For a casual look, dip the tops of your cooled cookies into the icing or use a spoon to drizzle it over.
- Piping Designs: Transfer the icing into a piping bag with a small round tip to create decorative patterns. This works best with thicker icing.
- Let It Set: Place the iced cookies on a cooling rack and allow the icing to set for at least 30 minutes before serving or storing.
Pro Tips for Icing Success
- Work Quickly: Icing can harden fast, so decorate one cookie at a time.
- Test Consistency: Drizzle a small amount on parchment paper to check the texture before icing all the cookies.
- Cleanup Hack: Use parchment paper under your cooling rack to catch drips and make cleanup easier.
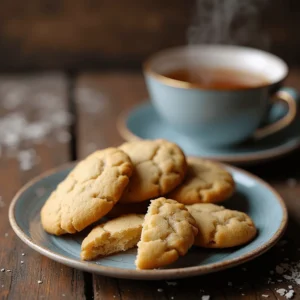
The icing not only adds sweetness but also makes your cookies visually stunning. Once they’re dry, these beauties are ready to steal the show at any gathering—or your next tea break!
Tips for Success
Want to ensure your Earl Grey cookies turn out perfect every time? Here are some expert tips to help you achieve cookie perfection:
1. Use Fresh Earl Grey Tea
- Why it matters: Fresh, high-quality Earl Grey tea leaves will infuse a stronger, more aromatic flavor into your cookies. If you’re using pre-packaged tea bags, make sure the tea is not stale.
2. Don’t Skip Chilling the Dough
- Key tip: Chilling the dough for at least 30 minutes helps the butter firm up, preventing the cookies from spreading too much during baking. This also makes the dough easier to roll out.
3. Roll the Dough Evenly
- For uniform cookies: Use a rolling pin with adjustable thickness guides or roll your dough between two sheets of parchment paper. This ensures that your cookies bake evenly and have a consistent texture.
4. Watch the Bake Time
- Avoid overbaking: Earl Grey cookies are best when they’re just starting to turn golden on the edges, but still soft in the center. Keep an eye on them, as they can quickly go from perfect to overdone.
5. Customize Your Icing
- For extra flavor: While the icing is optional, it adds a beautiful touch to your cookies. If you want to enhance the Earl Grey flavor, try steeping the tea leaves in the milk before adding it to the icing. You can also experiment with different extracts like almond or lemon.
6. Decorate with Care
- For stunning results: If you’re using piping to decorate your cookies, work quickly before the icing hardens. You can also add a little sparkle by sprinkling edible glitter or colored sugar for a festive look.
7. Keep Dough Portions Consistent
- Even baking: To ensure uniform cookies, use a small cookie scoop or your hands to form dough balls of the same size. This will help your cookies bake at the same rate, giving you perfectly uniform treats.
8. Let Cookies Cool Completely
- For best flavor: Cooling the cookies on a rack allows air to circulate, preventing them from getting soggy. It also helps the flavors to fully develop.
By following these tips, you’ll master the art of baking Earl Grey cookies with ease. Each batch will be fragrant, delicate, and perfectly baked, making them a hit at any gathering. Happy baking!
Storage and Freezing
Wondering how to keep your Earl Grey cookies fresh or make them ahead of time? Don’t worry—we’ve got you covered! Here’s everything you need to know about storing and freezing these delicious treats.
Storing Your Earl Grey Cookies
- Room Temperature: If you’re planning to enjoy your cookies within a few days, store them in an airtight container at room temperature. They’ll stay fresh for about 3–4 days.
- Layering: To prevent your cookies from sticking together, place parchment paper between the layers if you’re stacking them in a container.
- Keep Them Crisp: If you like your cookies a bit crispier, add a small piece of bread or a cookie freshness pack to the container. The bread helps maintain texture by absorbing excess moisture.
Freezing Your Earl Grey Cookies
- Baked Cookies: If you have leftovers or want to bake ahead for a special occasion, freeze the cookies once they’re completely cooled. Place them in a single layer on a baking sheet and freeze until solid (about 1–2 hours). Then, transfer them to an airtight freezer bag or container. They’ll last for up to 3 months!
- Unbaked Cookie Dough: For even more convenience, freeze the cookie dough. Roll it into dough balls and place them on a baking sheet to freeze individually. Once solid, store the dough balls in a freezer bag. When you’re ready to bake, just pop them straight into the oven (add a couple of minutes to the baking time).
- Icing: If you’ve iced your cookies, it’s best to freeze them without the icing. Icing doesn’t freeze as well and may change in texture. Instead, freeze the cookies first and ice them once thawed.
Thawing Your Frozen Cookies
- At Room Temperature: To thaw frozen cookies, simply let them sit at room temperature for about 20–30 minutes. If you’ve frozen dough balls, bake them straight from the freezer—no thawing needed!
- Reviving Softness: If your cookies lose a bit of their soft texture after freezing, pop them in the microwave for 10–15 seconds, and they’ll be good as new.
By storing and freezing your Earl Grey cookies properly, you can enjoy these delicate treats any time you like! Whether you bake them all at once or make them in advance for a special occasion, they’ll always be just as delightful.
Conclusion
These Earl Grey cookies are truly something special! Their fragrant, citrusy notes combined with a melt-in-your-mouth texture make them the perfect treat for any occasion. Whether you’re serving them at a tea party, packing them for a picnic, or simply enjoying a cozy afternoon snack, these cookies are sure to impress.
From the ease of making the dough to the optional lemony icing, every step is a breeze with the right techniques. Plus, they’re customizable to suit your preferences—whether you like them soft and chewy or with a crisp edge, there’s no wrong way to enjoy them.
And with tips on storage and freezing, you can make a big batch ahead of time and enjoy these delightful cookies whenever the mood strikes. So why wait? Gather your ingredients, and treat yourself to these delightful Earl Grey cookies today!
Happy baking, and enjoy the wonderful aroma filling your kitchen as you create these little bites of joy! 🌸🍪
Earl Grey Cookies Recipe
Ingredients
For the Cookies
- 2 cups 250g all-purpose flour: The foundation of a perfectly balanced cookie.
- 1/2 teaspoon baking powder: Helps create a slight lift for a tender texture.
- 1/4 teaspoon salt: Enhances all the flavors in the recipe.
- 2 tablespoons Earl Grey tea leaves: Finely ground for a smooth infusion of flavor.
- 3/4 cup 170g unsalted butter, softened: Brings rich, buttery goodness to every bite.
- 1/2 cup 100g granulated sugar: Sweetens the dough just right.
- 1/4 cup 50g powdered sugar: Adds a delicate texture to the cookies.
- 1 large egg: Binds the ingredients together and ensures a soft chewy result.
- 1 teaspoon vanilla extract: A subtle companion to the Earl Grey flavor.
For the Icing (Optional)
- 1 cup 120g powdered sugar: For a silky, sweet glaze.
- 2 –3 tablespoons milk: Adjusts the icing to the perfect consistency.
- 1 teaspoon lemon zest optional: Adds a bright, tangy contrast to the cookies.
Ingredient Notes and Substitutions
- Earl Grey Tea: Opt for high-quality loose-leaf tea or cut open a few tea bags. Grind the leaves finely using a spice grinder for the best texture.
- Butter: Ensure it’s softened for easy creaming. You can substitute salted butter but reduce the added salt in the recipe.
- Vanilla Extract: For a twist try almond extract or a splash of orange blossom water.
- Lemon Zest: Optional but highly recommended for adding a burst of freshness to the icing.
Instructions
Step 1: Prepare the Earl Grey Tea
- Grind the Earl Grey tea leaves into a fine powder using a spice grinder or mortar and pestle. This ensures the tea blends smoothly into the dough, giving every bite a uniform flavor.
Step 2: Mix the Dry Ingredients
- In a medium bowl, whisk together the flour, baking powder, salt, and ground Earl Grey tea leaves. Set aside.
Step 3: Cream the Butter and Sugars
- In a large mixing bowl, use a hand or stand mixer to beat the softened butter, granulated sugar, and powdered sugar until light and fluffy (about 2–3 minutes). This step is key to achieving a tender cookie.
Step 4: Add Wet Ingredients
- Mix in the egg and vanilla extract until fully incorporated. Scrape down the sides of the bowl to ensure even mixing.
Step 5: Combine Wet and Dry Ingredients
- Gradually add the dry ingredients to the wet mixture, stirring until just combined. Avoid overmixing, as this can result in tougher cookies.
Step 6: Chill the Dough
- Wrap the dough in plastic wrap and refrigerate for at least 30 minutes. Chilling prevents spreading and makes the dough easier to handle.
Step 7: Roll and Cut
- Preheat your oven to 350°F (175°C).
- Roll out the chilled dough on a lightly floured surface to about 1/4 inch thick. Use your favorite cookie cutters to create shapes, and transfer them to a baking sheet lined with parchment paper.
Step 8: Bake
- Bake for 10–12 minutes, or until the edges are just starting to turn golden. Keep an eye on them to avoid overbaking.
- Let the cookies cool on the baking sheet for 5 minutes, then transfer to a cooling rack to cool completely.
Pro Tips for Perfect Cookies
- Test Batch: Bake one cookie first to check spreading and adjust chilling time if needed.
- Even Thickness: Use rolling pin guides or stack rulers on either side of your dough for consistent thickness.
- Flavor Boost: If you want a stronger Earl Grey flavor, steep the ground tea leaves in the butter before mixing.
Notes
FAQs
Can I make Earl Grey cookies without the icing?
Absolutely! While the icing adds a lovely touch, the cookies themselves are delicious even without it. If you prefer a simpler treat, just skip the icing and enjoy the cookies as they are.
Can I use tea bags instead of loose leaf Earl Grey?
Yes, you can! If you’re using tea bags, just open them up and use the tea leaves inside. You’ll need about 2–3 bags for the right amount. Make sure to grind the leaves to release their full flavor.
How do I make the cookies more lemony?
To bring out a stronger citrus flavor, try adding more lemon zest to the dough or the icing. You could even add a little lemon juice to the icing for extra zing!
Can I add other flavors to the cookies?
Definitely! Earl Grey pairs beautifully with flavors like lavender, almond, or even a bit of cardamom. Try adding a teaspoon of lavender or almond extract to give the cookies a unique twist.
How do I prevent the cookies from spreading too much while baking?
Make sure to chill the dough before rolling it out. This will help the cookies maintain their shape. If you’re using a soft dough, chilling for at least 30 minutes will work wonders!
How can I make the cookies softer?
For a softer cookie, reduce the baking time slightly, and make sure to store them in an airtight container right after they cool. A little extra moisture from the container will keep them tender.
How long do Earl Grey cookies last?
If stored properly in an airtight container, these cookies will stay fresh for about 3–4 days at room temperature. For longer storage, freeze them, and they’ll last up to 3 months.
If you have any other questions, feel free to ask! We’re here to help you create the perfect batch of Earl Grey cookies every time. Enjoy baking! 🍪✨
Leave a Reply
There are no reviews yet. Be the first one to write one.